Raspberry Pi with BerryBoot and OpenELEC

I recently noticed that BerryBoot with OpenELEC makes really good combination on your Raspberry Pi and it is also really easy to setup.

Some time ago I purchased couple of RaspberryPi:s. I was waiting once they were comfortably running XBMC in 1080p resolution. I have had them on use with OpenELEC and RaspMC and recently liked OpenELEC a lot. I had to renew and do one installation from scratch.

berryboot-install-distro_thumb

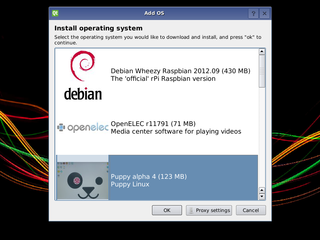
First downloaded BerryBoot. Installation with that goes smoothly, just formatted 8GB SD card to fat and extracted the zip to sd-card. Then plugged in keyboard, mouse, rj45 network cable, hdmi to monitor + Nokia usb charger to feed power. Selected OpenELEC and then some configuring. I added following to config.txt

gpu_mem=128
cma_lwm=16
cma_hwm=32
cma_offline_start=16

gpu_mem_512=256
arm_freq=850
core_freq=400
sdram_freq=400
gpu_freq=300

# Berryboot settings, do not change
kernel=kernel_rpi_aufs.img
initramfs berryboot.img

Once OpenELEC booted up, selected OpenELEC OS Settings and changed Keyboard layout to fi and Hostname to bit better and under Services – SSH – Start ssh server at boot. Then rebooted and after that you can log in as root with password: openelec.

Nowdays nano is bundled with OpenELEC so that you have there default.

Now logging in with ssh you can verify the speed change with cat /sys/devices/system/cpu/cpu0/cpufreq/scaling_cur_freq It should show 850MHz.

More detailed you can get with following command

for src in arm core h264 isp v3d uart pwm emmc pixel vec hdmi dpi ; do echo -e "$src:t$(vcgencmd measure_clock $src)" ; done
arm:    frequency(45)=850000000
core:   frequency(1)=399999000
h264:   frequency(28)=240000000
isp:    frequency(42)=240000000
v3d:    frequency(43)=0
uart:   frequency(22)=3000000
pwm:    frequency(25)=0
emmc:   frequency(47)=100000000
pixel:  frequency(29)=154000000
vec:    frequency(10)=0
hdmi:   frequency(9)=163683000
dpi:    frequency(4)=0

With vcgencmd measure_volts;vcgencmd measure_temp command you can determine the current voltage and chip temperature.

If you wanna really push more, you can try settings in config.txt like:

arm_freq=1050
core_freq=500
sdram_freq=500
over_voltage=6

but try safely one thing at a time. And remember, if you loose your filesystem undetectable, that almost always is because of overclocking or bad power supply. You can find more info from elinux.org RPI Config Overclocking options.

So basicly playing around with BerryBoot and OpenELEC is really easy. The only troublesome things are doing upgrades, as at least for now I haven’t been able to configure BerryBoot to do auto or even manual updates. Hope to get back on that later how to solve it.

Enabling MPEG2 and VC-1 decoding in Raspberry Pi XBMC

If you have tried to play on your Raspberry Pi XBMC mpeg2 content like DVB-T or DVB-T2 stored *.ts content, you might have noticed that only audio is played but not video. For this you will have to purchase licenses and install them.

You can start from Raspberry Pi Store. You will have to ssh to you Raspberry Pi and run following and pick the Serial.

root ~ # cat /proc/cpuinfo
Processor       : ARMv6-compatible processor rev 7 (v6l)
BogoMIPS        : 697.95
Features        : swp half thumb fastmult vfp edsp java tls
CPU implementer : 0x41
CPU architecture: 7
CPU variant     : 0x0
CPU part        : 0xb76
CPU revision    : 7

Hardware        : BCM2708
Revision        : 000e
Serial          : 0000000048421123
root ~ #

I’m doing this for several devices + also VC-1 codecs at the same time. Once you have all the serials needed, just add the serials to and purchase the licenses.
I didn’t found out other than paypal as payment. You will receive some email with instructions. Once you get the actual keys you just add following lines to config.txt. First one is for MPEG2 and second one for VC-1.

decode_MPG2=0x12345678
decode_WVC1=0x12345678

And that should be it.

Deleting partitions from SD card with Windows

If you play around with SD cards, eg. with Berryboot or similar for RaspberryPi, you might end up having many partitions in a SD card. If you need to use them in some other way, you might find it difficult to get rid of the partitons. You might be able to delete everything, but might also notice that some partions are hard to delete or remove.

Disk_Management

You might end up showing like this but you can’t Delete Volume. There is an easy way to get rid of that though with the standard windows tools.

Invoke cmd prompt
# Run diskpart with admin rights
diskpart
# type list disk to show the disk what you have (your sd must be detected and inserted)
DISKPART> list disk

Disk ### Status Size Free Dyn Gpt
——– ————- ——- ——- — —
Disk 0 Online 298 GB 0 B
Disk 1 Online 1920 MB 0 B

# you might see something different, but select the correct SD card disk as mine is Disk 1
DISKPART> select disk 1

Disk 1 is now the selected disk.

# then list partitions that you have, they might be more or different size, mine was this small berryboot partition
DISKPART> list partition

Partition ### Type Size Offset
————- —————- ——- ——-
Partition 1 Primary 70 MB 2048 KB

# then select the correct partition
DISKPART> select partition 1

Partition 1 is now the selected partition.

# and after that delete it
DISKPART> delete partition

DiskPart successfully deleted the selected partition.

# now you can exit from diskpart and see that the partition is deleted
DISKPART>exit

Disk_Management_2

That was the easyest way I could quickly figure how to get rid of those partitions, hopefully this helps someone.